Hato Workshop
Preserved Flower Frame | Purple
Preserved Flower Frame | Purple
Couldn't load pickup availability
A. Product Information
Finished Size: Approx. 26cm long x 13cm high
Type: DIY Craft Kit
Production Time: Approx. 45-60 minutes
Kit Includes:
● Wooden photo frame
● Sponge
● Glue & Tongs
● Preserved flowers
● Small decorations
*The actual product may have slight color variations due to lighting.
*This product is a craft kit and requires assembly.
*We use natural floral materials. Some materials may be substituted due to seasonal availability, which may lead to slight differences in color and shape.
Customer Service: Whatsapp +852 6104 5134
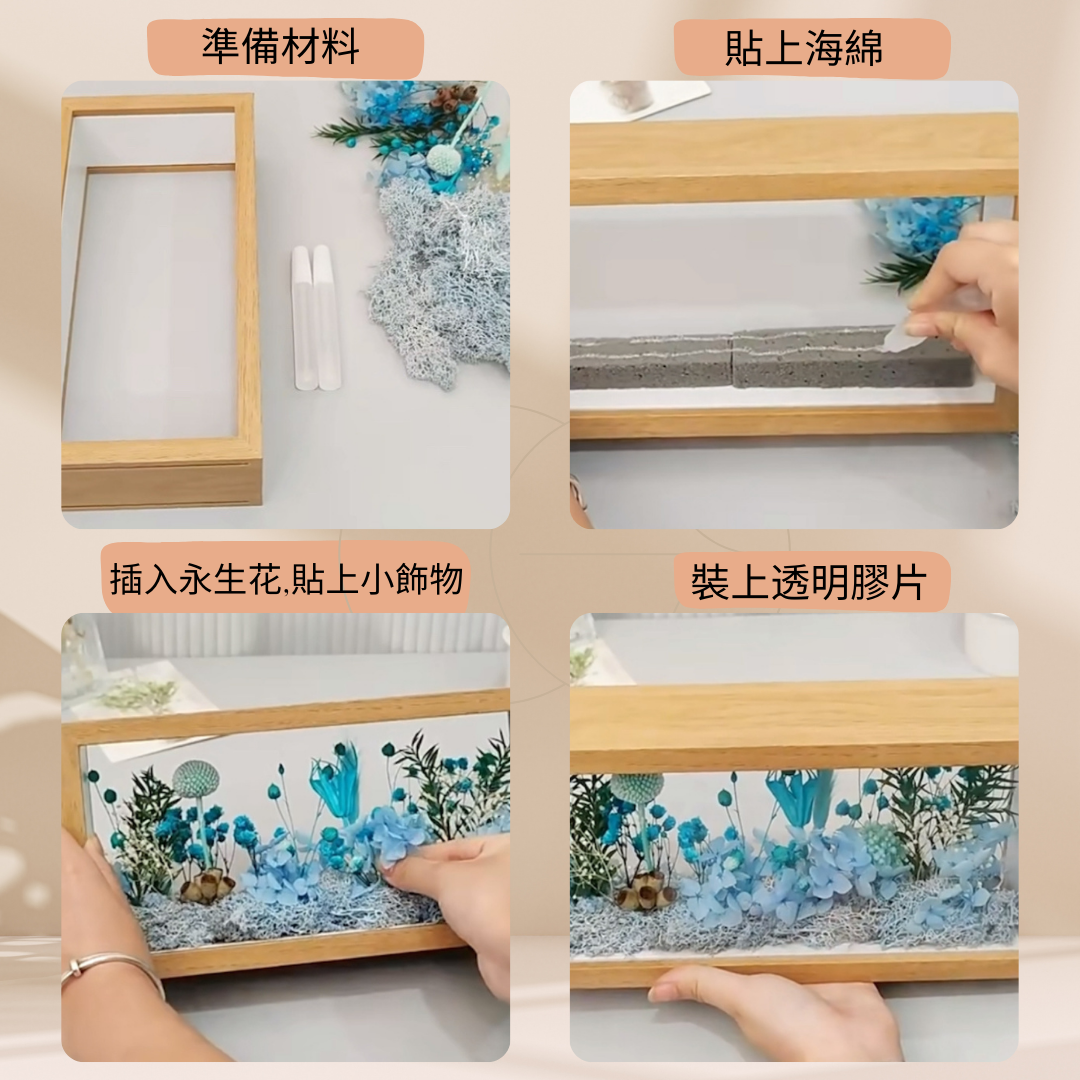
B. Production Tutorial

Steps:
1. Cut the sponge to size.
2. Insert the floral materials into the sponge.
3. Add small decorations.
4. Place your finished preserved flower frame wherever you like to add a touch of natural beauty to your space!
C. Objectives
| Target Group | A. Learning & Training | B. Benefits & Development |
|---|---|---|
| Seniors | 1. Linear Layout Planning: Learn how to arrange the flow and height variations of flowers in a rectangular frame, training sequential planning and visual flow cognition. 2. Fine Motor Coordination: Using tongs to insert delicate preserved flowers into specific spots on the sponge provides gentle training for hand stability and depth perception. |
1. Creating Lasting Memories: Preserved flowers symbolize "eternity." Handcrafting a piece that lasts creates a vessel for emotions and memories, bringing ongoing achievement and comfort. 2. Sensory Stimulation & Anti-aging: Touching different textures and focusing on aesthetic creation can activate the brain, serving as a form of gentle art therapy. |
| Children | 1. Concept of "Fragility" and "Care": Handling delicate flowers teaches children that some things require gentle care, while practicing tool use (tongs) develops caution. 2. Introduction to 3D Space: Learning to "insert" objects into a base (the sponge) builds basic 3D spatial concepts and understanding of depth and scale. |
1. Cultivating Patience: Unlike instant toys, this project requires step-by-step effort and careful arrangement, fostering concentration and the patience to "work for a beautiful result." 2. Narrative Skills: The rectangular frame acts as a small stage where children can create micro-stories (e.g., a "fairy's home" or "forest path") with flowers and decorations, sparking imagination. |
| Teenagers | 1. Practical Aesthetic Composition: The limited rectangular space is a perfect practice ground for composition rules like the "Golden Ratio," "rhythm and cadence," and "focal points." 2. Material Mixing & Design Thinking: Learning to harmoniously combine soft flowers, hard decorations, and porous sponges introduces foundational product design thinking. |
1. Personalized Aesthetics: The finished product makes excellent desk or wall decor. Designing an art piece that reflects personal taste is a key step in building a personal style. 2. Visual Outlet for Emotions: Using colors and layouts to express current moods (e.g., cheerful, calm, melancholic) provides a non-verbal way to release stress. |
| Adults | 1. Miniature Floral Landscape Techniques: Mastering the art of creating depth and extension within a limited space using material placement is a refined craft technique. |
1. Mindfulness: Focusing on the present moment, feeling the texture of the materials, and contemplating the layout allows one to disconnect from work and life stress for a calming, healing effect. |
D. FAQs
| Category | Common Issues | Solutions |
|---|---|---|
| Tools & Materials | 1. How do I use the tongs? Will they break the flowers? 2. What if petals break off by accident? |
1. Gently grip the "base of the stem" for support; avoid gripping the petals. 2. This is normal. Small fragments can be used to fill gaps and add detail. |
| Design & Composition | 1. I have no idea how to arrange it. 2. My design looks empty or cluttered. |
1. Test before fixing. Place the largest flowers first, then surround them with smaller ones. 2. Focus on 1-2 corners only; proper "negative space" makes for better design. |
| Technique & Securing | 1. The stems are too soft to pierce the sponge. 2. The sponge is visible and doesn't look good. |
1. Use the tongs to trim the stems shorter for easier insertion. 2. Use moss or small filler flowers at the bottom to cover the sponge perfectly. |
| Care & Completion | 1. How do I fix the small decorations? 2. How do I maintain the finished product? Can it get wet? |
1. Use a toothpick to apply a small amount of glue to the base of the decoration before placing it. 2. Absolutely NO water. Avoid direct sunlight and moisture to ensure long-lasting preservation. |